
Introduction: A Good Outdoor Refrigerator Installation Starts Before the Unit Arrives
Placing the outdoor refrigerator in a suitable location is much more challenging than just sliding it under a countertop. If you fail to consider the need for airflow and the exact dimensions of the cabinet opening, the fridge’s lifespan will be significantly reduced. You must take into account the way the door moves and also make sure that the power supply is available with appropriate protocols.
The high outdoor temperatures together with the moisture in the air create harsh conditions for refrigerator materials and operation. Direct sunlight and enclosed masonry cabinetry increase the heat load on the cooling system compared to climate-controlled indoor environments. This is especially important in installations where the appliances are smoothly integrated into the cabinetry:
- Built-In Outdoor Kitchens
- BBQ Islands
- Hospitality Bars
- Poolside Kitchens
The key consideration is refrigerator fit and ventilation. It should open easily and function correctly when the cabinet has been finished.
1. Start With the Refrigerator Before Finalizing the Outdoor Kitchen Cutout
Confirm the Installation Type First
Check whether the refrigerator is designed for use as a freestanding unit or for built-in use. Some units may offer both kinds of installation. A built-in refrigerator uses engineered forced-air condenser systems in order to expel the hot air from the front. It must therefore deal with heat properly when it is surrounded by cabinetry.
Every refrigerator that is rated for outdoor use cannot be placed under a countertop without first verifying its heat release mechanism.
Read the Product Dimensions as a Project Specification
It is important to distinguish between the appliance’s overall dimensions and those of the cabinet opening. Marketing expressions such as a nominal “24-inch class” refrigerator do not show the true size of the metal frame or the actual size of the cabinet rough-in openings. The dimensions of the cabinet alone should determine the size of the opening. The decision should be based on the height, the projection of the handle, and the particular installation drawing.
Before the countertop and cabinet openings are made, carefully check the manufacturer’s technical drawing and remember to allow for the sizes of any parts which project, such as door handles or hinges, as well as those of the bottom toe-kicks.
Plan Utilities Before the Cabinetry Is Closed
Outdoor refrigerators require an 115V/120V AC, 60Hz, 15-amp grounded electrical circuit. Before carrying out the installation, you must identify both the electrical outlet and the power cord routing. It is essential that neither the plugs nor the wiring should block the ventilation. This requirement also extends to the overall depth of the refrigerator and to access for servicing.
The refrigerator must stay upright for at least 24 hours before the electric power is connected. This allows the lubricating oil to drain back down into the sump. The presence of lubrication helps avoid the metal parts coming into contact with each other. When running dry, these create mechanical friction, which damages the parts. Ensure installation features enable inspection or servicing. There should be no need to dismantle the outdoor kitchen construction.
2. Outdoor Refrigerator Ventilation: Give Heat Somewhere to Go
Why Refrigerators Need Ventilation
The heat inside the cabinet is removed by the refrigeration system and discharged outside. When the rejection of heat is limited, the compressor has to work much harder. This places a strain on the system and at the same time results in higher energy bills together with a decrease in cooling efficiency.
Because of the outdoor temperature, the direct sunlight, and the poor air circulation, there is a small, local microclimate beneath the counter which rises above 120°F. the intense heat caused by this results in damage to the electronic control boards and triggers an emergency shut-off.
Front-Vent vs Rear-Vent Installation
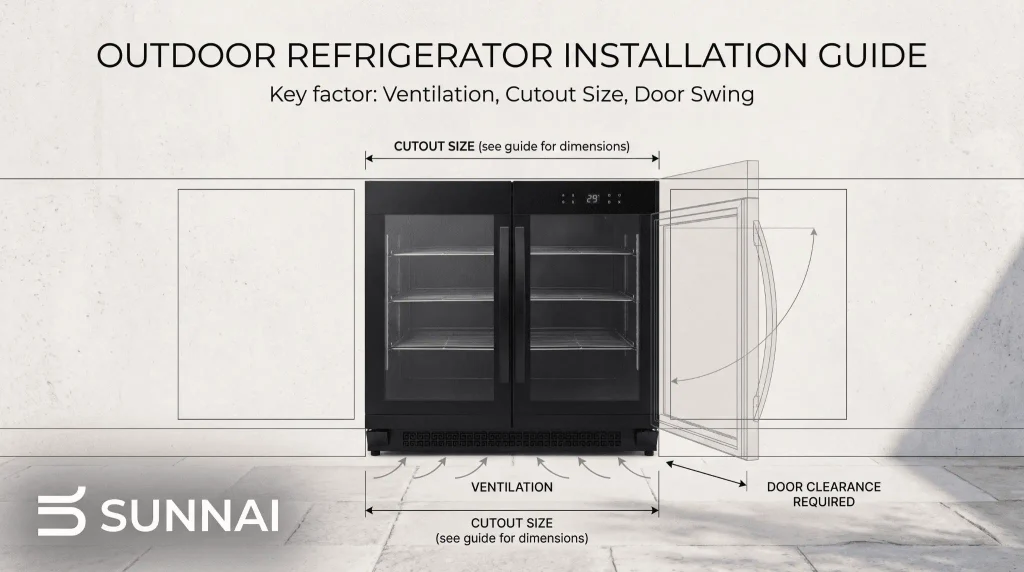
Built-in models with front ventilation draw in room-temperature air via one side of the lower toe-kick grille and discharge the hot exhaust from the opposite side. This setup is particularly beneficial when carrying out seamless, tight undercounter installations with zero-clearance arrangements.
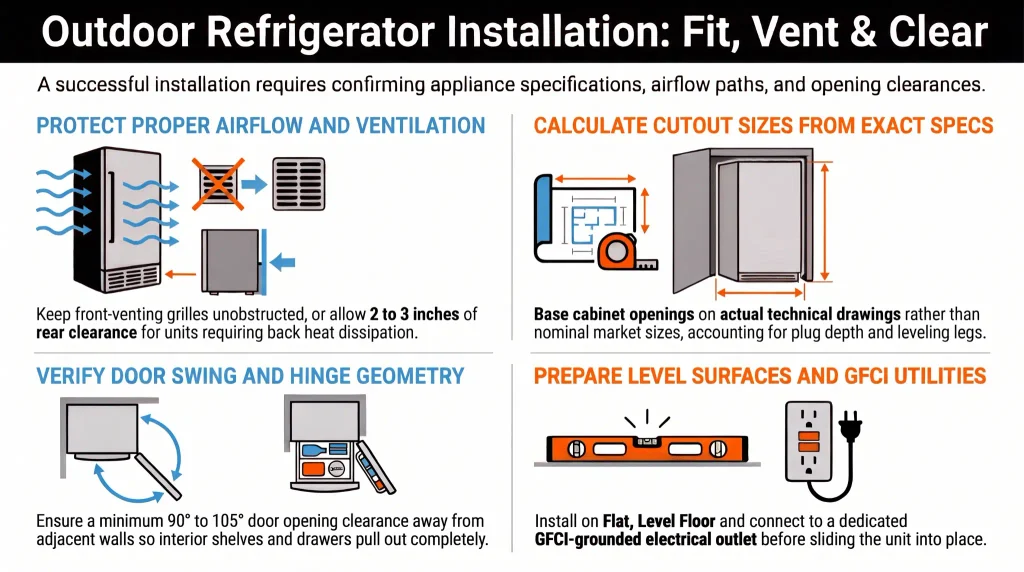
However, freestanding models with rear or side ventilation need 2–3 inches of clearance around the cabinet for natural convection. Cooling failure is quick in enclosed freestanding refrigerators. Checking the ventilation path before creating the refrigerator cabinet is essential.
Protect the Ventilation Path in Real Outdoor Kitchen Installations
You should not cover the ventilation openings with cabinet panels or with overlay kickplates. The same rule applies to decorative trim or to anything that is stored in them. It is essential to avoid having grills and other large heat-generating appliances increase the temperature around the refrigerator unnecessarily.
As debris and dust from the outside environment get into the toe-kick vents, the front grilles must be routinely vacuumed if proper air circulation is to be achieved. When evaluating the amount of sunlight the refrigerator will receive, the wall enclosure design should also be taken into account. Furthermore, attention should be paid to air movement when deciding where to place the refrigerator.
SUNNAI Outdoor Refrigeration for Built-In Project Planning
SUNNAI offers specialized refrigeration solutions for residential patios and outdoor kitchens, and its product range also includes items for BBQ areas, hospitality environments, and commercial entertainment spaces. The range of outdoor refrigeration products comprises models that are intended for integrated installation as well as those that are suitable for use as freestanding units.
For example, the SUNNAI SY-188 (https://www.cnsunnai.com/products/sy-188-side-by-side-outdoor-refrigerator/) side-by-side outdoor refrigerator has built-in front ventilation, so it looks clean and built-in in high-end outdoor kitchens, and there is no need for any open holes in the back wall. When specifying the product, customers can also specify the position of the handles, choose the exterior materials, and specify other aspects of the project. If purchased from a custom manufacturing OEM/ODM company, both the ventilation design and the product’s dimensions can be adjusted to meet specific requirements.
3. How to Calculate the Right Cutout Size for an Outdoor Refrigerator
Appliance Size Is Not Always the Same as Cutout Size
The dimensions given by the manufacturer in specifications refer to the bare metal chassis of the refrigerator itself. The cutout dimensions are the precise opening needed for installation. The additional tolerances allowed for installation vary from model to model and depend on the ventilation design, as well as being affected by the hinge structure and the specific countertop arrangement. You should not base the cabinet opening simply on the nominal width of the refrigerator. For reference, the following SUNNAI models should be considered:
- SY-51 Body Size: W595 x D582 x H820 mm
- SY-188 Body Size: W900 x D548 x H840 mm
Important note: The figures provided are the dimensions of the appliance casing and not necessarily the dimensions that the cabinet must have. You should always consult the technical drawing specific to the model.
Check Width, Height and Depth Separately
- Ensure that the unit is able to enter and exit the cabinet opening without binding. You should also consider the adjacent side panels as well as the manufacturer’s extra structural tolerances for the model together with the hinge geometry.
- When considering height, you should take the adjustable leveling legs and the finished floor level into account, and find out whether the refrigerator has to be flush with the countertop or with the fronts of the adjacent cabinets.
- To check the cabinet depth, you must consider the depth of the door and the projection of the handle and also work out the length of the plug, that of the cord, and the space at the back for the utilities. You then need to decide whether the refrigerator door is to be flush with the cabinet or should project from it, this decision having to comply with the manufacturer’s specifications.
Measure the Finished Opening, Not Only the Construction Drawing
The countertop’s thickness, together with the use of tile backings, may cause the unfinished wooden rough framing openings to shrink by as much as 1 inch, and likewise the stone cladding with granite edges and the internal cabinet liners also contribute to this shrinkage.
You should check the finished opening at a number of points along the top, middle, and bottom as well as on the front and rear sides since outdoor construction surfaces such as masonry tend to bow while the concrete is drying and may thus not be perfectly square. The opening must then be checked once again before the appliance is delivered.
Leave a Service Strategy, Not Just an Installation Opening
The refrigerator should be constructed in such a way that it can be taken out without causing any damage to the countertops or the built-in cabinetry. The electrical connections and the water shut-off valves must remain accessible, and in order to achieve this, a coiled section of service loop of 2 to 3 feet in length should be placed behind the unit. Planning the design should include any possible future maintenance that might be needed on the compressor and the control board, as well as the door adjustments and any service needs relating to drainage.
4. Door Clearance Can Determine Whether the Refrigerator Actually Works in the Space
Check the Full Door Swing Before Installation
A refrigerator can fit exactly within the opening yet still be hard to use whenever the door doesn’t open enough. Walls and cabinets that are at right angles can prevent the door from moving. The returns on an island, the structural posts, and other nearby appliances often lead to similar problems. For instance, a refrigerator placed at the end of an outdoor kitchen island might have enough cabinet space but entirely inadequate door clearance if the hinge side is too close to a stone or masonry wall. Check the actual door swing against the final kitchen layout.
Account for Handles and Hinge Geometry
Even when the appliance body fits within the opening, the handles may extend 2 to 2.5 inches beyond the cabinet edge, thus obstructing the movement of neighboring drawers. Since some hinges need extra space on the side as the door swings, it is necessary to determine whether the door edge moves outwards or sideways. in some cases, the movement involves both outward and sideways movement. Certain high-end models make use of hinges that pull inwards in order to reduce the amount of side space required.
Think Beyond the Door to Shelves, Drawers and User Access
Ensure that the internal glass shelves or chrome wire racks can be removed when the door is open, since generally a minimum opening angle of 90° is needed in order to have full access, the best opening angle being 105°. Do not place the refrigerator in a position where an open door would block a main patio walkway or traffic corridor. In hotels and entertainment areas, it is advisable to allow both guests and staff to use it at the same time.
Test the Installation as a Complete Outdoor Kitchen Workflow
When someone is actually standing at the grill or at the prep station, the refrigerator should be opened. It is important to check whether the traffic in the refrigerator area interferes with the seating areas or the bar stools, and attention should also be given to any extra cooking burners and the trash pull-out drawers. It has to be verified that the service staff will be able to access and remove the appliance later on without meeting any obstruction. The professional builders should carry out a physical simulation of all the cooking movements before the heavy countertops are permanently secured.
Conclusion: Specify the Refrigerator Before You Build Around It
When you are fitting an outdoor refrigerator, you should plan it in relation to the cabinetry rather than putting it in at the last hour. The ventilation design must be checked alongside the cutout sizes given for the model. Just as important, planning should be done in advance for the door swing, the electrical access, and the service path before the final fabrication takes place.
Under outdoor conditions, the significance of these details is even greater since ambient heat and direct sunlight are major influences. High humidity and the thermal load resulting from an enclosed cabinet also greatly raise these operating demands. This consideration is relevant not only to buyers and product distributors but also to building designers and project developers, who should likewise focus on the model’s dimensions and the installation requirements. To guarantee smooth integration for both commercial and residential projects, coordination with SUNNAI’s support team about OEM/ODM customization before the cabinet is fabricated should take place.
FAQs
Q. What is the required amount of ventilation for an outdoor refrigerator?
If the unit has a bottom air discharge and is already fitted with designated heat dissipation vents, and a vertical model such as the SY-63, SY-28, SY-12, or SY-75 is to be installed in a recessed manner, then an upper air outlet area of at least 200 cm² and a lower air intake area of at least 200 cm² are required for adequate heat dissipation.
Q. What is the method for measuring the opening for an outdoor refrigerator?
The finished opening dimensions should only be measured at various points after the tiling or stone cladding has been completely installed, and in this measurement, both the top and bottom as well as the front and back must be checked. When determining the chassis dimensions, the manufacturer’s additional structural tolerances (which are generally 1/4″ in width, 1/2″ in depth, and 1″ in height) should be added, followed by a verification that the floor is perfectly flat. It is always necessary to consult the official technical drawings particular to the model and not the general retail sizes.
Q. Does the clearance needed for refrigerators that have front vents apply to the sides and the back?
With front-vent models, air is drawn in and expelled entirely via the lower toe-kick, allowing the units to be positioned straight up against the side cabinets without the need for any clearance on the sides. That said, it is still a good idea to leave 1/2 inch of space at the back to prevent the power cord plug from being squeezed, as well as 1/4″ to 1″ of room at the top to make sure the unit can be slid in easily and that the leveling legs can be adjusted.
Q. How much space is needed around the door for a built-in refrigerator?
Standard doors require a clearance of at least 90° to open, though 105° is preferable if you want to pull the internal shelves out completely. If the doors are installed next to a side wall or a masonry pillar, they must have at least 2.5 inches of space on the side and an extra 2 to 2.5 inches of outward space whenever the unit is fitted with extended door handles.
Q. What should contractors check before installing an outdoor kitchen refrigerator?
Contractors must confirm the exact installation type: built-in vs. freestanding. They also need to verify the ventilation provision along with the presence of a dedicated 115V/120V AC, 60Hz, 15A grounded circuit. Crucially, they must ensure the unit is upright for 24 hours before powering on so the compressor oils settle. Afterward, they must adjust the leveling legs to line up the door seals. Finally, they need to ensure a safe way to fix the fridge for future repairs.